Saturday, July 9, 2016

In the previous post of this tutorial, I helped you know how to display value of fields in Visualforce Page. Today I will show you how to get data from the user and update this data to the database.

To capture input data from a user, use the <apex:form>  tag with: 
  + <apex:inputField> Tag: This tag is most often used in a form. <apex:inputField>  renders the appropriate input widget based on field’s type. 
     For example, If field type is picklist field, a drop-down list displays on the form. If date field, a calendar widget displays on the form. 
  + <apex:commandButton> Tag to submit the form. 

For example, the following page displays and allows users to edit and save the Email of a Contact: 

Step 1: Create a visualforce page

<apex:page standardcontroller="Contact">
    <apex:form>
        Hello <br/>
        <b>{!contact.name}</b><br/>
        <apex:inputField value="{!contact.email}"/><br/>
        <apex:commandButton action="{!save}" value="Save Email"/><br/>
    </apex:form>
</apex:page>

+  The <apex:inputField> tag: Value attribute contains {!contact.email} used to display the field’s value in the page.
+  The <apex:commandButton> tag: Action attribute invokes the save action of the standard Contact controller.
Step 2: Add the Contact ID as a query string parameter to the end of the URL in your browser's address bar.
For example: https://c.ap2.visual.force.com/apex/HelloPage?id=0032800000U4mkxAAB


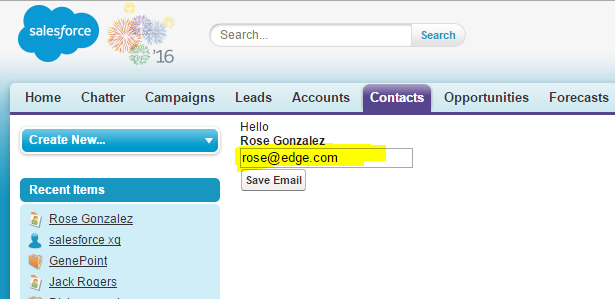
Step 3: Edit and save Email


Step 4: Email has been updated

I look forward to receiving feedback from you to improve this post. Thank you for visiting my blog.

Wednesday, July 6, 2016

In this guide, I'm going to show you how to get started with Visualforce Page by display value of fields from a record in Visualforce Page.

Follow these step-by-step instructions to display Field Values with Visualforce.

Step 1: Login Salesforce => Create your Salesforce Project => Create your visualforce page

To display value of fields from a record in Visualforce Page you need to create a visualforce page. If you need more information for this step, please click:
 + How to create New Salesforce Project with MavensMate In Sublime Text 3: http://salesforcexq.blogspot.com/2016/07/Installing-MavensMate-with-Sublime-Text-3.html 
 + How to create a Visualforce page: http://salesforcexq.blogspot.com/2016/07/what-is-visualforce-introduction-to-visualforce-pages.html
For example:
<apex:page>
    Hello
</apex:page>

Step 2: Add the standardController attribute to the tag.

To access fields from a record data such as: User, Account, Contact, ... or custom object record, you need to associate your page with a controller.

Salesforce includes standard controllers for every standard object and custom object with basic database operations, such as queries.

For example, to display an Contact's name on a visualforce page, use the standard controller for Contact, add the standardController attribute to the tag.
<apex:page standardcontroller="Contact">
    Hello
</apex:page>

Step 3:  Access fields on the record

You can now access fields on the SObject record currently in context by using syntax: {!<sObject>.<fieldname>}
For example, to display an user's name on a page, use {!contact.name}.
<apex:page standardcontroller="Contact">
    Hello <br/>
    {!contact.name}
</apex:page>

The {!contact.name} expression makes a call to the getRecord() method in the standard Contact controller to returns the record that is currently in context, based on the value of the id query string parameter in the Visualforce page URL. It then uses dot notation to access the name field for that record.

Step 4: Add a query parameter to the page URL 

To access an Contact record, you must add a query Id parameter to the page URL. To do this:
+ Find the ID of an Contact.

+ Add the Contact ID as a query string parameter to the end of the URL in your browser's address bar. For example: https://c.ap2.visual.force.com/apex/HelloPage?id=0032800000U4mkzAAB

* Result *

Saturday, July 2, 2016

1. What is Visualforce?

Visualforce is the framework used to build, custom user interfaces on the Force.com platform. This is very interesting tool. Developers define pages through specifying Visualforce markup and a Visualforce controller.

This framework includes a component-based markup language, that is very similar to Hyper Text Markup Language (HTML) and supports many development technologies such as HTML, CSS, Ajax, Javascript, jquery,... within a single tag

Visualforce controllers consist of instructions that specify what happens when users interact with page components (Click link, Click Button, Selected checkbox,...). The behavior of Visualforce Page components can be controlled by the standard logic for Salesforce pages, or developers can associate their own logic with a controller class.


+ Standard controller: Automatically provided for standard objects and custom objects with basic database operations, such as queries and saves,... 

+ Custom controller: You can write your different logic, functionality or override existing functionality that was already provided in a standard controller. 

+ Extension controller: Adds to or overrides behavior in a standard or custom controller


2. How to create a Visualforce page

We will be utilizing Sublime text throughout our tutorial for code execution as it is simple and user friendly for learning. If you don’t already have install MavensMate with Sublime Text 3 CLICK HERE (Installing MavensMate with Sublime Text 3) 

 Step 1: Go to  MavenMate => Metadata => New Visualforce Page


Step 2: In the list of available pages => Search for Visualforce page and And Select Visualforce Page.


Step 3: Enter your visualforce page name and press Enter. Your Visualforce Page will created and a page will be displayed in your salesforce project


Step 4: You now have a Visualforce page that includes default text. Next, Edit your new page and Ctrl + Shift + S to save.

Ex: I want this page displays the text "Hello"


Step 5: HOW TO ACCESS THE VISUALFORCE PAGE? Your page can be accessed using https://c.ap2.visual.force.com/apex/yourPageName


We will be utilizing Sublime Text 3 throughout our tutorial for code execution as it is simple and user friendly for learning. 

1. What is MavensMate?

 MavensMate is a SublimeText plugin that aims to replicate the functionality of the Eclipse-based Force.com IDE. Powerful open source tool for building Force.com IDEs. Building Force.com applications easy and fun for developers regardless of platform or text editor.

MavensMate very rich interface, color code texture, easy synchronization with force.com 

Mavensmate is actually Sublime Text plugin for force.com developers, this plugin allows you to perform operations like compile apex classes, trigger, built visualforce pages, deploy apex test to server

2. Step-By-Step Guide to Install MavensMate with Sublime Text 3

Step 1: If you don’t already have Sublime Text 3, download and Install it from http://www.sublimetext.com/3

Step 2: When installation Sublime Text 3 is complete, you will Open Sublime Text 3 => Select View => Show Console to Open Sublime text Console


Step 3: Copy this python code And Paste it on the console

import urllib.request,os,hashlib; h = '2915d1851351e5ee549c20394736b442' + '8bc59f460fa1548d1514676163dafc88'; pf = 'Package Control.sublime-package'; ipp = sublime.installed_packages_path(); urllib.request.install_opener( urllib.request.build_opener( urllib.request.ProxyHandler()) ); by = urllib.request.urlopen( 'http://packagecontrol.io/' + pf.replace(' ', '%20')).read(); dh = hashlib.sha256(by).hexdigest(); print('Error validating download (got %s instead of %s), please try manual install' % (dh, h)) if dh != h else open(os.path.join( ipp, pf), 'wb' ).write(by)

And Press Enter

Step 4: Restart Sublime Text for completing the installation.

Step 5: Go to Preferences => Package Control => Enter And Select: Install Package


Step 6: In the list of available packages => Search for MavensMate and And Select MavensMate.


Step 7: MavensMate will get installed and a welcome text will be displayed in the editor. You will also get a new MavensMate menu


Step 8: Set Workspace
Before creating a project, you have to specify the path to your workspace folder where you will be storing the project files.
Open MavensMate -> Settings -> User and search for mm_workspace. Enter the absolute path to your workspace folder (Eg: "C:\\MavensmateWorkspace") and save the settings file.


Step 9: By default, MavensMate will capture the save file operation and compile to the Salesforce.com server automatically. You can disable auto compiling on the server under Mavensmate -> Settings -> User and search and set "mm_compile_on_save" to false.


 3. How to create New Salesforce Project with MavensMate In Sublime Text 3?

Now you can create your project by:

Step 1: Going to MavensMate -> Project -> New Project. A browser window will open where you need to specify your Salesforce credentials.


Step 2:
 + Input "Project Name"
 + Input "Salesforce.com Username"
    If you don't have account on Salesforce developer, CLICK HERE (How to Create Salesforce Developer Account?)
 + Input "Salesforce.com Password" (with password+SecurityToken if have Security Token).
    If you do not have your Salesforce security token, you will should reset it. To do this Click Here to Get or Reset Your Security Token - Salesforce
 + The Advanced tab allows you to customize the metadata subscription list
 + The Project Metadata tab allows you to choose the components to be downloaded. 


Click Create Project

Step 3: MavensMate will download the specified metadata components from the salesforce server. After completing this process, the project will load in Sublime.


Step 4: You can create Apex classes, Apex Triggers, Visualforce Pages, ...

You can perform Apex testing, compilation and debugging directly from MavensMate.


Step 5: If you want to get last changes from Force.com server

Right Click => MavenMate => Refresh From Server


Step 6: Save code to sever:

Right Click => MavenMate => Compile Selected Files OR Ctrl + Shift + S

MavensMate IDE works faster than Eclipse and deploy the components directly to the salesforce server.

Syntax highlighting and code completion features is very useful during application development.
1. What is the Salesforce Security Token?

 The security token is designed to increase the security between the end user and Salesforce.com servers, reducing the chance of your account being hacked or accessed by an unauthorised user.

 Your Salesforce security token should have been emailed to you when you set up your Salesforce account or the last time you reset your password.

 When you access Salesforce from an IP address that’s outside your company’s trusted IP range using a desktop client or the API, you need a security token to log in.

 + The security token is a 24 character, automatically generated
      Ex: 17PH0TIvfuVxG6s9x4wza3vc
 + Security tokens can be manually re-set at any time at the users request
 + Security token’s are case sensitive
 + A users security token will change automatically when their password is updated
 + Each security token is unique to a specific user and cannot be re-used

 2. Resetting Your Security Token in Salesforce 

Step 1: Sign in to salesforce https://login.salesforce.com/ 

Step 2: Go to Username => Click My Settings
      Or: Click Here (https://ap2.salesforce.com/ui/setup/Setup?setupid=PersonalSetup)


Step 3: In My Setting => Select Personal => Select Reset My Security Token => Click Reset Security Token => Salesforce will send a new security token to the email address for your account.


Step 4: Sign in your Email and copy your token

1. What is Force.com IDE (Eclipse)?

The Force.com IDE is open-source, This was first and official IDE from Salesforce.
The Force.com IDE is a powerful client application for creating, modifying, deploying Force.com applications, integrated development environments, letting you code, compile, test, package, and deploy all from within the IDE.
These instructions show you how to install the Force.com IDE into your existing Eclipse distribution or upgrade from a previous version.

2. Step-By-Step Guide to Configure Force.com IDE with Eclipse

Step 1: Go to Eclipse download site (http://www.eclipse.org/downloads/) then Download and Intall Eclipse.
Step 2: After Install Eclipse => Launch Eclipse => Go to Help => Install New Software
Step 3: In the new dialog Click Add => In the Add Repository dialog set
            Name: Force.com IDE
            Location: http://media.developerforce.com/force-ide/eclipse42
    => Click OK button


Step 4: In the list of available plug-ins in the Available Software dialog => Check Force.com IDE and Force.com IDE Debugger => Click Next to Download Force.com IDE


Step 5: In the Review Licenses dialog => Click I accept the terms of the license agreements => Next, Click Finish to Install Force.com IDE => When installation is complete, you will be prompted to restart. Click Yes.


Step 6: When Eclipse restarts, Go to Window => Open Perspective => Other, select Force.com and click OK.

Step 7: Now, you can develop and customize Force.com applications in Eclipse!

3. How to create New Salesforce Project In eclipse?

Very easy to create a Fore.com project in eclipse

Step 1: Launch Eclipse => Select File => New => Force.com Project

Step 2: In the New Force.com Project Dialog => Enter
           + Project name
           + Username
           + Password
              If you don't have account on Salesforce developer, CLICK HERE (How to Create Salesforce Developer Account?)
           + Security Token: If you do not have your Salesforce security token, you will should reset it. To do this Click Here to Get or Reset Your Security Token - Salesforce
           + Click Next to continue

Step 3: In the choose Initial Project Contents you can choose metadata components from your organization to include in this project. And Click Finish
+ Apex and Visualforce (classes, triggers, pages, components, and static resources): Retrieve only Apex and Visualforce components, including classes, triggers, components, pages, and static resources.
+ Selected metadata components: Use the Choose Metadata Components dialog to specify which Force.com metadata components you want to retrieve in a project.
+ Contents of package: Retrieve the contents of a particular package.
+ None: Retrieve no components.


Step 4: After retrieve metadata, you will get all your selected metadata into your workspace.


Step 5: This tool is very good to develop application in Salesforce. You can create Apex Class, Apex Trigger, Visualforce Page,... by Select File => New => ....

Step 6: If you want to get last changes from Force.com server or save code to sever. Right Click => Force.com => ...

Friday, July 1, 2016

1. What is the Salesforce Developer Console?

The Developer Console is accessible from within your Salesforce organization, and provides a collection of tools you can use to create, edit, debug and test applications.

2. Open Developer Console

Step 1: Login Salesforce: https://login.salesforce.com/
Step 2: Click Username => Click Developer Console


Step 3: Developer Console window will Appear


+ Menu bar: Can help create new file (Apex Class, Apex Trigger, Visualforce Page, ...), Open (class, trigger, page, ...), execute Apex code, Run test, ...
+ A workspace with a tab for each open item.
+ Logs tab: view a list of logs
+ Tests tab: View status of test class
+ Checkpoints tab: View your checkpoints and results
+ Query Editor: Query and view results
+ A panel View state, Problems and Progress tabs for viewing real-time execution data.
+ ...

The Developer Console can help:
 + Writing and compiling code: When you save a trigger or class, the code is automatically compiled, errors will be reported.
 + Debugging and Troubleshooting: Use the Logs, Checkpoints tab
 + Editing Source Code:  Open and edit Apex class, Visualforce Page, ...
 + Testing and Validating Performance: You can execute tests of specific test classes or all classes, inspect debug logs that include database events, Apex processing, workflow, and validation logic.
 + Executing SOQL and SOSL Queries: Write, Edit and Execute SOQL and SOSL Queries. Results are displayed in a Query Results grid that allows you to open, create, update, and delete records
 + Color coding: Editor uses a color scheme for easier readability of code elements.

3. Executing Code in Developer Console

Step 1: Open Developer Console
Step 2: Goto Debug => Open Exevute Anonymous Window
      OR: Ctrl + E


Step 3: Inter your code, Click Execute Button


Step 4: After Executing the code every time Log is created. To open Log go to Logs Tab and double click on the Log


Step 5: This log contain lots of information. You can filter the results by using check boxes (This Frame, Executable, Debug Only, Filter). Example, I selected Debug Only Check box, so it will display debug log statements.


4.  Executing SOQL and SOSL Queries:

Step 1: Open Developer Console
Step 2: Goto Query Editor => Input your query => And Click Execute Button


Step 3: Results are displayed in a Query Results grid that allows you to open, create, update, and delete records